【Android】OkHttp内部工作原理
前言:本文的写作主要目的有两个,一方面是为了加强对于 OkHttp 的理解,巩固对已学知识,另一方面是为了在往后遗忘时便于回顾。由于笔者的学习资源来源于网络博客,所以可能会有一些内容跟其他文章相似,或者引用了其他文章的内容(文中已注明)。首先放两个推荐阅读的文章:
简介
特点
- 支持 Http2/SPDY 协议
- 连接池复用,减少延迟
- 缓存响应信息减少重复请求
- 支持 GZIP 压缩
使用
- 创建 OkHttpClient 对象。OkHttpClient 大部分时候都只需创建一个,以便可以最大限度地资源复用(每个实例中都有连接池、线程池、缓存等)。
- 创建 Request 对象。Request 代表请求报文,可以通过它设置请求Url、请求方法、请求体等。
- 创建 Call 对象,通过 Call 发起网络请求。可通过 Call 对象发起同步或异步请求。
- 处理响应结果。
OkHttpClient client = new OkHttpClient();

Request request = new Request.Builder()
    .url(url)
    .build();
client.newCall(request).enqueue(new Callback() {
    @Override
    public void onFailure(Call call, IOException e) {
        Log.v(TAG, "**onFailure**" + e.getMessage());
    }

    @Override
    public void onResponse(Call call, Response response) throws IOException {
        Log.v(TAG, "**onResponse**" + response.body().string());
    }
});
上面的代码进行了一个简单的 GET 请求,下文将描述这一请求的内部工作流程。
工作过程
创建 OkHttpClient
OkHttpClient 类使用了建造者模式,可以通过其内部类 Builder 对其成员变量进行配置。OkHttpClient 只对外提供了一个无参的构造方法,但内部拥有另外一个以 default 修饰的构造方法,当使用new OkHttpClient 时通过内部类 Builder 为其提供了默认值,下面是 OkHttpClient 类的一部分成员变量:
  //OkHttpClient.java
  final Dispatcher dispatcher;
  final List<Protocol> protocols;
  final List<Interceptor> interceptors;
  final List<Interceptor> networkInterceptors;
  final CookieJar cookieJar;
  final @Nullable Cache cache;
  final SocketFactory socketFactory;
  final ConnectionPool connectionPool;
  final Dns dns;
  final int connectTimeout;
  final int readTimeout;
  final int writeTimeout;
  ...
创建 Request
Request 类同样使用了建造者模式,可通过其内部类 Builder 对请求体进行配置。
public static class Builder {
    HttpUrl url;
    String method;
    Headers.Builder headers;
    RequestBody body;
    Object tag;
    ...
    public Builder url(String url) {
      if (url == null) throw new NullPointerException("url == null");

      // Silently replace web socket URLs with HTTP URLs.
      if (url.regionMatches(true, 0, "ws:", 0, 3)) {
        url = "http:" + url.substring(3);
      } else if (url.regionMatches(true, 0, "wss:", 0, 4)) {
        url = "https:" + url.substring(4);
      }

      HttpUrl parsed = HttpUrl.parse(url);
      if (parsed == null) throw new IllegalArgumentException("unexpected url: " + url);
      return url(parsed);
    }
    ...
    public Request build() {
      if (url == null) throw new IllegalStateException("url == null");
      return new Request(this);
    }
    ...
}
网络请求
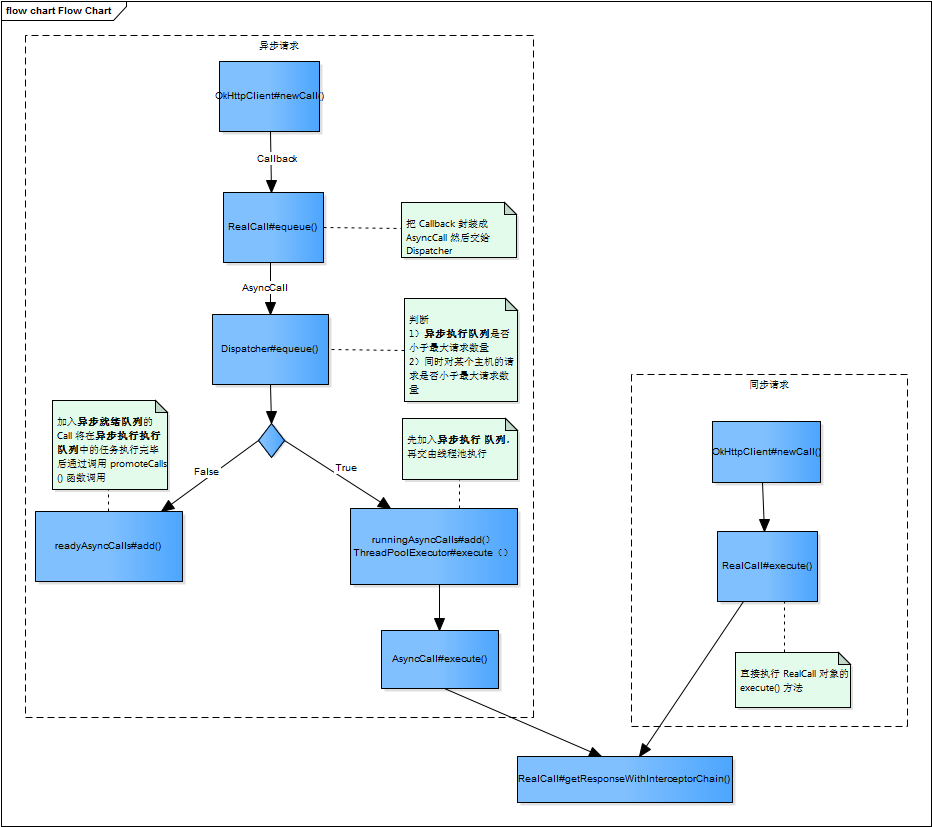
OkHttp 支持同步和异步两种请求,总的来说,同步会直接执行,而异步最后会使用线程池来执行,但不管是同步还是异步,最后都会通过 getResponseWithInterceptorChain() 方法来执行,下图是同步请求和异步请求执行到getResponseWithInterceptorChain() 的区别,后文只描述了异步执行的过程。
OkHttpClient 对象生成 Call 对象时,最终内部调用的是 RealCall,总体来说 client.newCall(request).equeue(callback) 分为两步:
- OkHttpClient 接收 Request 对象,生成 RealCall 对象。RealCall 实现了 Call 接口,在同步中它是被执行的对象,而在异步中 AsyncCall 时被执行的对象,AsncCall 间接实现了 Runnable 接口,后者是前者的内部类。
- RealCall 把实现了回调接口 Callback 的对象加入到队列当中。Callback 接口定义了两个方法
onFailure()和onResponse(),在请求成功或失败时会被调用。
//AsyncCall.java
@Override protected void execute() {
    boolean signalledCallback = false;
    try {
        Response response = getResponseWithInterceptorChain(); //这里是真正进行网络请求的入口
        if (retryAndFollowUpInterceptor.isCanceled()) {
            signalledCallback = true;
            responseCallback.onFailure(RealCall.this, new IOException("Canceled")); //请求失败
        } else {
            signalledCallback = true;
            responseCallback.onResponse(RealCall.this, response); //请求成功
        }
    } catch (IOException e) {
        if (signalledCallback) {
            // Do not signal the callback twice!
            Platform.get().log(INFO, "Callback failure for " + toLoggableString(), e);
        } else {
            eventListener.callFailed(RealCall.this, e);
            responseCallback.onFailure(RealCall.this, e);
        }
    } finally {
        client.dispatcher().finished(this); //这里最终会调用 promoteCall(),promoteCall 将从就绪队列中取出新的 AsyncCall 交给线程池执行。
    }
 }
}
下面的代码是 AsyncCall#execute() 代码,大体的逻辑是:首先使用getResponseWithInterceptorChain() 进行网络请求,根据响应结果进行回调,最后取出新的 AsyncCall 执行。
进入 RealCall#getResponseWithInterceptorChain():
//RealCall.java
Response getResponseWithInterceptorChain() throws IOException {
    // Build a full stack of interceptors.
    List<Interceptor> interceptors = new ArrayList<>();
    interceptors.addAll(client.interceptors());
    interceptors.add(retryAndFollowUpInterceptor);
    interceptors.add(new BridgeInterceptor(client.cookieJar()));
    interceptors.add(new CacheInterceptor(client.internalCache()));
    interceptors.add(new ConnectInterceptor(client));
    if (!forWebSocket) {
        interceptors.addAll(client.networkInterceptors());
    }
    interceptors.add(new CallServerInterceptor(forWebSocket));

    Interceptor.Chain chain = new RealInterceptorChain(interceptors, null, null, null, 0,
                                                       originalRequest, this, eventListener, client.connectTimeoutMillis(),
                                                       client.readTimeoutMillis(), client.writeTimeoutMillis());

    return chain.proceed(originalRequest);
}
OkHttp 的请求使用了责任链模式,把缓存、建立连接、网络请求等不同的功能分配给不同的 Interceptor,最后把所有的 Interceptor 连成一条链,按顺序去执行,当最后一个 Interceptor 执行完毕之后逐级地返回响应结果,所有的 Interceptor 功能如下(来源:OkHttp 实现原理):
- 用户自定义的 Interceptor 通过
client.interceptors()拿到整个自定义列表。上面提到的 HttpLoggingInterceptor 就是在这个列表中。- RetryAndFollowUpInterceptor 主要作用就是处理失败之后重试。比如处理未授权、PROXY 授权等等。OkHttpClient.Builder 中的 proxyAuthenticator 还有 authenticator 等都会在这里被调用。Chain 里面的 StreamAllocation 在这里开始实例化,前面都是 null。
- BridgeInterceptor 字面意思是桥梁连接应用和网络。主要会完善(添加)请求的 Header、处理 cookie、自动解压 Gzip 等等。
- CacheInterceptor 主要作用是缓存 Response。官方推荐在 OkHttpClient.Builder 中使用
okhttp3.Cache。- ConnectInterceptor 主要是生成网络连接。调用 StreamAllocation.newStream,分配一个复用的 Connection。然后以 HttpStream 和 RealConnection 的形式交给下一个 Interceptor (即 CallServerInterceptor )。其中在 HttpStream 中来确定使用 HTTP1x 还是 HTTP/2 ( HTTP/2 and SPDY )协议。
- CallServerInterceptor 请求服务器。与服务器进行交互。获取数据并且封装起来返回给 ConnectInterceptor。然后逐级分发回去。最后
getResponseWithInterceptorChain()接受数据,返回给用户。
进入 RealInterceptorChain#proceed():
//RealInterceptorChain.java
public Response proceed(Request request, StreamAllocation streamAllocation, HttpCodec httpCodec,
    RealConnection connection) throws IOException {
  if (index >= interceptors.size()) throw new AssertionError();

  calls++;

  // If we already have a stream, confirm that the incoming request will use it.
  if (this.httpCodec != null && !this.connection.supportsUrl(request.url())) {
    throw new IllegalStateException("network interceptor " + interceptors.get(index - 1)
        + " must retain the same host and port");
  }

  // If we already have a stream, confirm that this is the only call to chain.proceed().
  if (this.httpCodec != null && calls > 1) {
    throw new IllegalStateException("network interceptor " + interceptors.get(index - 1)
        + " must call proceed() exactly once");
  }

  // Call the next interceptor in the chain.
  RealInterceptorChain next = new RealInterceptorChain(interceptors, streamAllocation, httpCodec,
      connection, index + 1, request, call, eventListener, connectTimeout, readTimeout,
      writeTimeout); //index 是列表的索引,从 0 开始
  Interceptor interceptor = interceptors.get(index); //获得具体的 Interceptor
  Response response = interceptor.intercept(next); //调用具体的 Interceptor 的方法

  // Confirm that the next interceptor made its required call to chain.proceed().
  if (httpCodec != null && index + 1 < interceptors.size() && next.calls != 1) {
    throw new IllegalStateException("network interceptor " + interceptor
        + " must call proceed() exactly once");
  }

  // Confirm that the intercepted response isn't null.
  if (response == null) {
    throw new NullPointerException("interceptor " + interceptor + " returned null");
  }

  if (response.body() == null) {
    throw new IllegalStateException(
        "interceptor " + interceptor + " returned a response with no body");
  }

  return response;
}
这里从0开始取出拦截器列表中具体的 Interceptor,调用其 intercepte() 方法, 当获得响应结果之后逐级地返回。
OkHttp 拥有的 Interceptor 如上文所述,下文将只对 ConnectionInterceptor 和 CallServcerInterceptor 进行说明。
ConnectInterceptor
ConnectInterceptor 的工作是建立网络连接、复用可用连接等,下面是 ConnectInterceptor 提供的唯一的非构造方法,这个方法也将被责任链中上一个 Interceptor 调用。
//ConnectInterceptor.java
@Override public Response intercept(Chain chain) throws IOException {
    RealInterceptorChain realChain = (RealInterceptorChain) chain;
    Request request = realChain.request();
    StreamAllocation streamAllocation = realChain.streamAllocation();

    // We need the network to satisfy this request. Possibly for validating a conditional GET.
    boolean doExtensiveHealthChecks = !request.method().equals("GET");
    HttpCodec httpCodec = streamAllocation.newStream(client, chain, doExtensiveHealthChecks);
    RealConnection connection = streamAllocation.connection();

    return realChain.proceed(request, streamAllocation, httpCodec, connection);
}
ConnectInterceptor#intercept()基本上通过 StreamAllocation 来建立、复用网络连接等功能,下面是StreamAllocation 的介绍(来源 深入理解OkHttp3(3):Connections):
StreamAllocation 类似中介者模式,协调 Connections、Stream 和 Call 三者之间的关系。每个 Call 在 Application 层
RetryAndFollowUpInterceptor实例化一个StreamAllocation。相同 Address(相同的Host与端口)可以共用相同的连接 RealConnection。
- StreamAllocation 通过 Address,从连接池 ConnectionPools 中取出有效的 RealConnection,与远程服务器建立 Socket 连接。
- 在处理响应结束后或出现网络异常时,释放 Socket 连接。
- 每个 RealConnection 都持有对 StreamAllocation 的弱引用,用于连接闲置状态的判断。
进入StreamAllocation#newStream:
//StreamAllocation.java
public HttpCodec newStream(
    OkHttpClient client, Interceptor.Chain chain, boolean doExtensiveHealthChecks) {
    int connectTimeout = chain.connectTimeoutMillis();
    int readTimeout = chain.readTimeoutMillis();
    int writeTimeout = chain.writeTimeoutMillis();
    int pingIntervalMillis = client.pingIntervalMillis();
    boolean connectionRetryEnabled = client.retryOnConnectionFailure();

    try {
        RealConnection resultConnection = findHealthyConnection(connectTimeout, readTimeout,
                                                                writeTimeout, pingIntervalMillis, connectionRetryEnabled, doExtensiveHealthChecks); //找到可复用的 RealConnection
        HttpCodec resultCodec = resultConnection.newCodec(client, chain, this);

        synchronized (connectionPool) {
            codec = resultCodec;
            return resultCodec;
        }
    } catch (IOException e) {
        throw new RouteException(e);
    }
}
newStream() 首先通过findHealthyConnection()找到健全可用的连接,再根据协议生成 HttpCodec,HttpCodec 是什么?(来源:拆轮子系列:拆 OkHttp)
它是对 HTTP 协议操作的抽象,有两个实现:
Http1Codec和Http2Codec,顾名思义,它们分别对应 HTTP/1.1 和 HTTP/2 版本的实现。在
Http1Codec中,它利用 Okio 对Socket的读写操作进行封装,Okio 以后有机会再进行分析,现在让我们对它们保持一个简单地认识:它对java.io和java.nio进行了封装,让我们更便捷高效的进行 IO 操作。
进入StreamAllocation#findHealthyConnection() ,这里不贴代码,概括性地说,该方法主要做了两件事:
- 调用
StreamAllocation#findConnection(),寻找可复用的连接(也有可能是新创建的) - 通过
RealConnection#isHealthy()判断该连接是否健全可用
首先看第一点,下面是findConnection()部分主要的代码:
  private RealConnection findConnection(int connectTimeout, int readTimeout, int writeTimeout,
      int pingIntervalMillis, boolean connectionRetryEnabled) throws IOException {
      ...
      synchronized (connectionPool) {
          if (released) throw new IllegalStateException("released");
          if (codec != null) throw new IllegalStateException("codec != null");
          if (canceled) throw new IOException("Canceled");
          ...
          if (this.connection != null) {
            // We had an already-allocated connection and it's good.
            result = this.connection;
            releasedConnection = null;
          }
          ...
          if (result == null) {
            // 从连接池中获取 connection
            Internal.instance.get(connectionPool, address, this, null);
            if (connection != null) {
              foundPooledConnection = true;
              result = connection;
            } else {
              selectedRoute = route;
            }
          }
          ...
          if (result != null) {
             // If we found an already-allocated or pooled connection, we're done.
              return result;
      }
       ...
      synchronized (connectionPool) {
          if (canceled) throw new IOException("Canceled");

          if (newRouteSelection) {
            // Now that we have a set of IP addresses, make another attempt at getting a         connection from the pool. This could match due to connection coalescing.
            List<Route> routes = routeSelection.getAll();
            for (int i = 0, size = routes.size(); i < size; i++) {
              Route route = routes.get(i);
              Internal.instance.get(connectionPool, address, this, route);
              if (connection != null) {
                foundPooledConnection = true;
                result = connection;
                this.route = route;
                break;
              }
            }
          }

          if (!foundPooledConnection) {
            if (selectedRoute == null) {
              selectedRoute = routeSelection.next();
            }

            // Create a connection and assign it to this allocation immediately. This makes it possible
            // for an asynchronous cancel() to interrupt the handshake we're about to do.
            route = selectedRoute;
            refusedStreamCount = 0;
              //创建新的连接
            result = new RealConnection(connectionPool, selectedRoute);
            acquire(result, false);
         }
    }
    ...
}
方法首先尝试从连接池中获取已存在的、具有相同地址的、请求数量未超上限的 RealConnection 返回,如果没有,将创建一个新的连接对象。
再看 RealConnection#isHeathy():
public boolean isHealthy(boolean doExtensiveChecks) {
    if (socket.isClosed() || socket.isInputShutdown() || socket.isOutputShutdown()) {
        return false;
    }

    if (http2Connection != null) {
        return !http2Connection.isShutdown();
    }

    if (doExtensiveChecks) {
        try {
            int readTimeout = socket.getSoTimeout();
            try {
                socket.setSoTimeout(1);
                if (source.exhausted()) {
                    return false; // Stream is exhausted; socket is closed.
                }
                return true;
            } finally {
                socket.setSoTimeout(readTimeout);
            }
        } catch (SocketTimeoutException ignored) {
            // Read timed out; socket is good.
        } catch (IOException e) {
            return false; // Couldn't read; socket is closed.
        }
    }
总结得出,以下情况的 RealConnection 会被认为是不健康的:
- Socket 关闭
- Socket 输入/输出流关闭
- Http2Connection 处于 shutdown 状态
- post 请求下输入流 Source 处于 exhuasted 状态
CallServerInterceptor
CallServerInterceptor 是责任链的最后一个 Interceptor,它的职责是发起网络请求。
CallServerInterceptor#intercept():
  @Override public Response intercept(Chain chain) throws IOException {
    ...
    if (HttpMethod.permitsRequestBody(request.method()) && request.body() != null) {
      ...
      if (responseBuilder == null) {
        // Write the request body if the "Expect: 100-continue" expectation was met.
        realChain.eventListener().requestBodyStart(realChain.call());
        long contentLength = request.body().contentLength();
        CountingSink requestBodyOut =
            new CountingSink(httpCodec.createRequestBody(request, contentLength));
        BufferedSink bufferedRequestBody = Okio.buffer(requestBodyOut); //使用 Okio

        request.body().writeTo(bufferedRequestBody);
        bufferedRequestBody.close();
        realChain.eventListener()
            .requestBodyEnd(realChain.call(), requestBodyOut.successfulCount);
      } else if (!connection.isMultiplexed()) {
        // If the "Expect: 100-continue" expectation wasn't met, prevent the HTTP/1 connection
        // from being reused. Otherwise we're still obligated to transmit the request body to
        // leave the connection in a consistent state.
        streamAllocation.noNewStreams();
      }
    }

    httpCodec.finishRequest();

    if (responseBuilder == null) {
      realChain.eventListener().responseHeadersStart(realChain.call());
      responseBuilder = httpCodec.readResponseHeaders(false);
    }

    Response response = responseBuilder
        .request(request)
        .handshake(streamAllocation.connection().handshake())
        .sentRequestAtMillis(sentRequestMillis)
        .receivedResponseAtMillis(System.currentTimeMillis())
        .build();
    ...
    return response;
  }
代码的大概逻辑是利用 HttpCodec 对象写入请求的 Header、Body,然后接收响应的结果进行处理返回。这里引用其他文章的解读(来源:拆轮子系列:拆 OkHttp):
核心工作都由
HttpCodec对象完成,而HttpCodec实际上利用的是 Okio,而 Okio 实际上还是用的Socket,所以没什么神秘的,只不过一层套一层,层数有点多。